Programming Healthypi 5 with Zephyr
Healthypi 5 also supports programming using the Zephyr Real-Time Operating System (RTOS). Zephyr is designed for resource-constrained devices and offers a flexible platform for developing applications that require real-time capabilities. Zephyr's versatility allows developers to create more complex applications and take advantage of its real-time features for precise control and responsiveness.
Programming Healthypi 5 with Zephyr RTOS consists of the following steps:
- Install Zephyr environment and the Zephyr SDK.
- Build the Healthypi 5 Zephyr firmware
- Flash the firmware to the Healthypi 5
Install Zephyr environment and the Zephyr SDK
-
Update the Update OS and Install dependencies
-
Install the Zephyr Software Development Kit SDK which contains toolchains for each of Zephyr’s supported architectures, which include a compiler, assembler, linker and other programs required to build Zephyr applications.
Build the Healthypi 5 Zephyr firmware
-
Create a workspace and get the zephyr source code inside the workspace.
-
Enter the root directory of the Healthypi 5 Zephyr workspace.
-
Update the workspace's projects based on the contents of the manifest file
-
Finally build the fimware based on the Healthypi kit that you have and the functionality either by using west build commands or by running the respective shell scripts.
| Healthypi Compatible Kit | ||
|---|---|---|
| Healthypi Basic Kit OR Healthypi Complete Kit with ILI9488 (White) Display |
west build -p auto -b healthypi5_rp2040 app -DEXTRA_CONF_FILE='overlay-bt.conf;overlay-display-ili9488.conf;overlay-logger-sd.conf' -DCONFIG_HEALTHYPI_OP_MODE_DISPLAY=n -DEXTRA_DTC_OVERLAY_FILE='healthypi5_rp2040_display_ili9488.overlay;healthypi5_rp2040_sd.overlay' |
make_basic_ili9488.sh |
| Healthypi Basic Kit OR Healthypi Complete Kit with ST7796 (Black) Display |
west build -p auto -b healthypi5_rp2040 app -DEXTRA_CONF_FILE='overlay-bt.conf;overlay-display-st7796.conf;overlay-logger-sd.conf' -DCONFIG_HEALTHYPI_OP_MODE_DISPLAY=n -DEXTRA_DTC_OVERLAY_FILE='healthypi5_rp2040_display_st7796.overlay;healthypi5_rp2040_sd.overlay' |
make_basic_st7796.sh |
| Healthypi Complete Kit with ILI9488 (White) Display | west build -p auto -b healthypi5_rp2040 app -DEXTRA_CONF_FILE='overlay-bt.conf;overlay-display-ili9488.conf;overlay-logger-sd.conf' -DCONFIG_HEALTHYPI_OP_MODE_DISPLAY=y -DEXTRA_DTC_OVERLAY_FILE='healthypi5_rp2040_display_ili9488.overlay;healthypi5_rp2040_sd.overlay' |
make_display_ili9488.sh |
| Healthypi Complete Kit with ST7796 (Black) Display | west build -p auto -b healthypi5_rp2040 app -DEXTRA_CONF_FILE='overlay-bt.conf;overlay-display-st7796.conf,overlay-logger-sd.conf' -DCONFIG_HEALTHYPI_OP_MODE_DISPLAY=y -DEXTRA_DTC_OVERLAY_FILE='healthypi5_rp2040_display_st7796.overlay;healthypi5_rp2040_sd.overlay' |
make_display_st7796.sh |
Flash the firmware to the Healthypi 5
Firmware can be flashed to your Healthypi device by either draging and dropping the firmware or by using a Raspberry Pi Debug Probe(not included with the kit, you will need to get one separately).
You may find an explanation of the drag and drop method on the main page. Update your device with the latest firmware with ease using the .uf2 file found in the Healthypi 5 Zephyr workspace in build/zephyr folder.
To flash using a Raspberry Pi Debug Probe, install OpenOCD using the commands.
-
Download openocd for Windows from here: OpenOCD Windows
-
Copy
binandsharedirs to C:\Program Files\OpenOCD\ -
Add C:\Program Files\OpenOCD\bin to ‘PATH’ environment variable
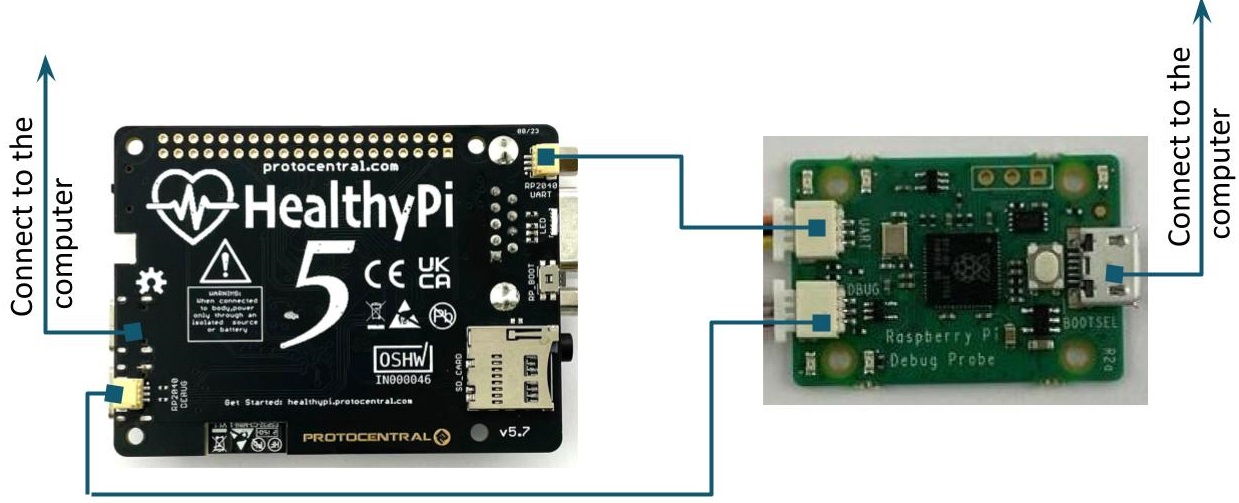
Connect the Raspberry Pi Debug Probe to the Healthypi in following manner and you are ready to flash your new firmware.
-
Connect the jumper wire from the UART port of Raspberry Pi Debug Probe to the RP2040 UART connector of Healthypi. The RP2040 UART connector of Healthypi is located below the Spo2 port.
-
Connect the jumper wire from the Debug port of Raspberry Pi Debug Probe to the RP2040 Debug connector of Healthypi. The RP2040 Debug connector of Healthypi is located below the RP2040 port.
-
Connect the Raspberry Pi Debug Probe and the computer using a B type cable.
-
From the command prompt continue,