Hooking up the Sensors
Setting up the sensors and connecting their respective cables with Healthypi is simple and easy. Prepare the device and follow the steps to prepare the body for vital monitoring and you have a Healthypi 5 vital monitoring device in your hands.
Device preparation
-
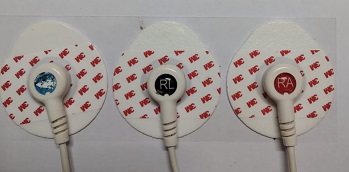
The disposable ECG electrodes provided with the Healthypi device are Uni-Gel electrodes covered with a thin layer of conductive gel, to enhance their contact with the skin and are designed like snap-on buttons. Ensure that the electrodes are not damaged and the conductive gel is intact.
-
The spo2 probe connector contains nine male connectors inside. Ensure that the connectors are not missing and not damaged.
-
The Spo2 probe clip needs to be void of dust and dirt.
-
Clean the probe connectors present on the Healthypi device.
Skin preparation
Healthypi 5 sensors are getting inputs directly from the skin hence some consideration must be given to using proper hygienic controls. Skin is a poor conductor of electricity and therefore skin resistance plays a critical role in acquisition of ECG trace quality. To reduce resistance at the skin and ecg electrode contact following steps are to be taken
-
Since body hair can form an insulated layer between the skin and the electrode surface, be careful not to place the electrodes over hairy areas. In some rare cases, shaving may be required.
-
The skin must be dry and free from dead cells and oil.
-
Dry the Skin vigorously to increase the Capillary blood flow of the tissue.
-
Electrodes must be in full contact with the skin.
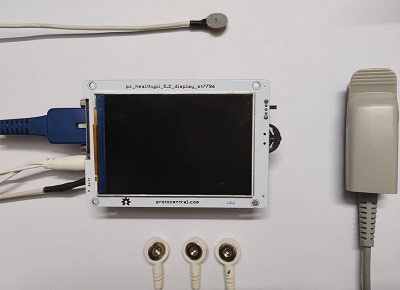
Setting up sensors with Healthypi 5
Connecting sensor cables to the device
In order to record a given physiological signal, the proper type of sensor must be connected to the correct input.
-
For the ECG trace and respiration, the ECG probe needs to be connected to the ECG Probe connector.
-
For PPG trace and Spo2 measurements, connect the Spo2 Probe to the Spo2 Probe Connector.
-
For temperature measurements, connect the temperature qwiic cable to the qwiic port.
Note
The temperature qwiic cable can also be connected to the qwiic ports present on the Healthypi carrier Board
Connecting to the body
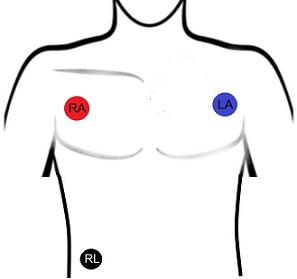
Step 1: Healthypi 5 ECG trace requires three leads, Right Arm (RA), Left Arm (LA) and Left Leg (LL). Connect the Leads to three different Disposable Surface Electrodes.
Step 2: Stick the Disposable electrodes to the body.
Step 3: Connect the jack of the ECG electrode to the ECG jack on the Healthypi 5.
Step 4: With the upper and the lower jaw of the Spo2 probe clip open, place the index finger on the base of the clip.
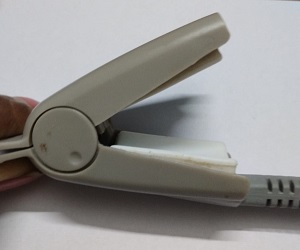
Step 5: Move the index finger forward, till the finger is above the sensor window. Ensure that the fingertip is against the finger stopper.
Step 6: The sensor should be oriented in such a way that the cable is positioned below the hand.
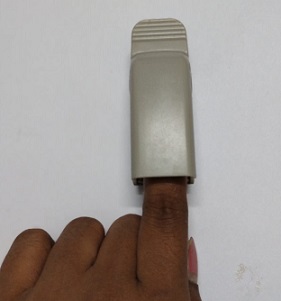
Note: In case if the index finger is not available or cannot be positioned properly, the smaller fingers can be used instead.
Step 7: Connect the temperature Qwiic cable to the Qwiic port on the Healthypi main board.

Step 8: Hold the stainless steel contacts provided on the temperature Qwiic cable to get the temperature readings.
Your Healthypi 5 is now ready for vital monitoring !
General instructions for use
-
Power the Healthypi Board using a A to C type USB cable (not provided in the kit) or a 3.7-V / 2000-mAh LiPo battery. Ensure the battery is charged.
-
Connect the sensor cables to the device and the body as mentioned in Setting up sensors with Healthypi 5.
-
After the session, power OFF the device and disconnect all the cables. We recommend that you store the healthypi device in the silver cover provided.
Don'ts
-
Do not use the thumb as it may lead to inaccurate Spo2 readings.
-
Using the sensor in the presence of bright lights may result in inaccurate measurements. In such cases, cover the sensor site with an opaque material.
-
Some factors may affect the accuracy of saturation measurements. Such factors include: excessive patient motion, fingernail polish, use of intravascular dyes, excessive light, poor blood perfusion in the finger, extreme finger sizes or improper placement of the sensor.
-
Do not apply tape to secure the sensor in place or to tape it shut; venous pulsation may lead to inaccurate saturation measurements.
-
Do not place the finger too much inside the clip.
-
The disposable electrodes are intended to be used only once. Repeated use of the same electrodes may lead to a faulty ECG Trace.
-
Do not dip the temperature sensor in any liquid. The sensor is meant to measure the temperature of the human body only.